
Bring simple paper shapes together to make a colorful Thanksgiving turkey, with easy tips for arranging the feather fan evenly before adding the body and face.

A few basic paper shapes are all you need to turn a sheet of colorful paper into a cheerful Thanksgiving turkey. Triangles, rectangles, and circles come together to create the body, eyes, beak, feet, and bright feather fan.
The best part is that children can see how individual shapes become a recognizable animal as they arrange and glue them together. That makes this a particularly nice activity when you want cutting, arranging, and decorating to be part of the fun.
There is one detail worth getting right before you reach for the glue: the feather arrangement. The feathers sit behind the brown body, so their spacing and direction determine how full the finished turkey looks. It is much easier to create a balanced fan when you arrange the pieces first and glue only after you like the shape.

The measurements below follow the supplied tutorial, but they do not need to be treated as rigid templates. You can make the pieces larger or smaller as long as the proportions still work together.
Things that you need before crafting:
Gather:
- Brown colored paper or cardstock
- Orange, yellow, and red colored paper
- White paper
- Black marker or pen
- Scissors
- Craft glue or a glue stick
- Ruler, optional
For younger children, an adult can prepare the pieces ahead of time. Older children can help measure, draw, and cut their own shapes.
How To Make:
Start With the Turkey’s Body
The brown body gives you the main shape to build everything else around.
For the body, use a piece of brown paper approximately 10 × 8 cm.
- Mark the center of the bottom edge.
- Place a ruler from one top corner to that center point.
- Draw the diagonal line.
- Repeat from the opposite top corner to the same center point.
- Cut along the lines to create a large brown triangle.
The pointed end becomes the turkey’s head area, while the wider lower portion forms the body.
Check the shape before decorating
Hold the triangle upright before adding anything.
You want the point to be at the top and the wider part toward the bottom. This gives you a clear idea of where the face and feet will eventually go.
If the triangle is noticeably uneven, correct it now. Once the eyes, beak, and feathers are attached, trimming the body becomes much harder.

Give the Turkey Its Face
Now that the body is ready, add the eyes before the smaller facial pieces.
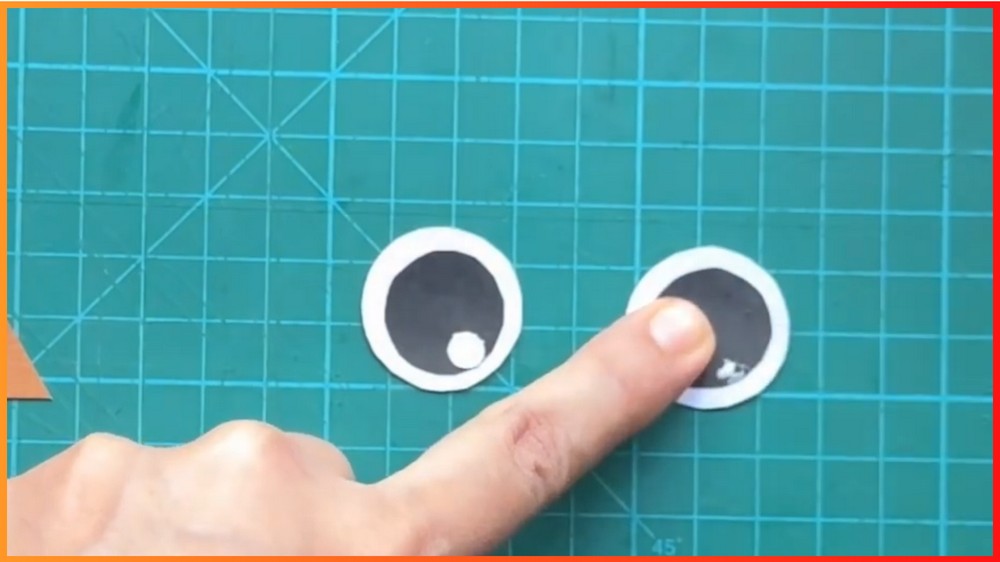
Make the eyes
Cut:
- Two white circles approximately 2.5 cm in diameter
- Two black circles approximately 2 cm in diameter
Glue one black circle onto each white circle.
These layered circles create simple paper eyes without needing purchased googly eyes.
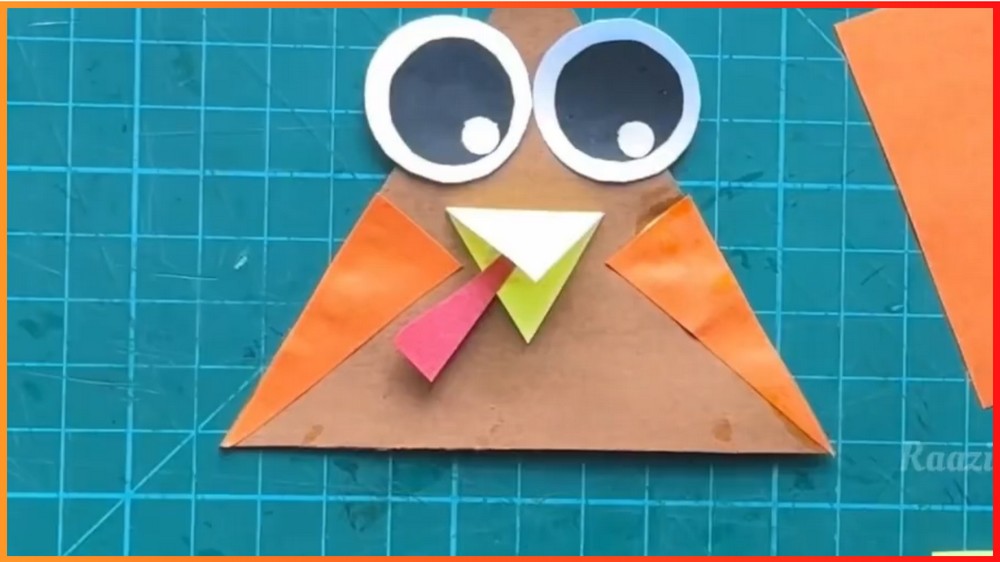
Place them near the upper portion of the brown triangle. Leave enough room underneath for the beak and snood.
Add the beak
Cut a yellow rectangle approximately 4 × 2.5 cm.
Trim it diagonally to create a small triangle, then glue it directly below the eyes.
Before pressing it down, check that the point is facing outward and that the beak is reasonably centered between the eyes.
A slightly crooked beak can make the whole face look off-center, so this is one of those tiny details worth checking before the glue sets.

Add the red snood
Cut a narrow strip of red paper approximately 1 × 3 cm.
Shape it into a small teardrop or wavy piece and place it beside the beak.
Glue it down once you are happy with its position.
You do not need a perfectly identical snood shape every time. A little variation can make each paper turkey look different.
Build the Feather Fan Before You Glue It
This is the step that makes the turkey instantly recognizable.
Cut several feather pieces from orange, yellow, and red paper. The tutorial uses a mixture of triangles and longer strips, but you can vary the shapes slightly if you want a more playful tail.
Before applying glue, spread the pieces behind the brown body.
Start near the center and work outward so the feathers form a fan.
Why arrange them first?
If you glue the first feather immediately, you may have less room for the next ones. The final pieces can become crowded, or one color may end up hidden.
Instead:
- Place the brown body on your work surface.
- Slide the feather pieces behind it.
- Spread them upward and outward.
- Check that different colors can be seen.
- Adjust the spacing until the fan looks balanced.
- Only then begin gluing.
The brown body should overlap the lower portions of the feathers, while the colorful sections remain visible around it.

A simple feather-spacing trick
Do not try to make every gap exactly equal.
A better approach is to check the overall fan. If the left and right sides feel reasonably balanced and the colors are distributed well, the tail will look natural even if individual gaps differ slightly.
Attach the Feather Layers
Once you are happy with the arrangement, glue the feather pieces from behind the brown body.
Work gradually rather than covering the entire back with glue.
If several pieces overlap, allow the lower pieces a little time to grip before adding another layer. This helps prevent the feathers from sliding away from the arrangement you just created.
If a feather moves while you are gluing, reposition it before the adhesive dries.
The goal is to keep the colorful fan visible rather than allowing the layers to collapse into one thick bundle.

Finish With the Feet
The feet are small, but they help anchor the turkey visually.
Cut two yellow rectangles approximately 1.5 × 3 cm.
Trim the lower edges to create simple webbed feet.
Glue the feet to the bottom back of the brown body, allowing them to extend below the body.
Once the glue is secure, use a black marker to draw a few small claw lines.
Because these pieces are tiny, younger children may find them easier to handle if an adult prepares them in advance.

What to Check Before the Glue Dries
Give the turkey a quick visual check while the adhesive is still workable.
Look at:
- Body: Is the brown triangle upright?
- Eyes: Are they positioned close to the top and reasonably balanced?
- Beak: Is it below the eyes and facing the correct direction?
- Snood: Is the red detail beside the beak?
- Feathers: Can you see the different colors behind the body?
- Feet: Are both feet visible beneath the body?
This short check can save you from discovering a misplaced piece after everything has dried.
Turn the Feathers Into a Thanksgiving Activity
The colorful tail can become more than decoration.
For a gratitude version, write one thing you are thankful for on each feather before arranging and gluing them.
This works particularly well because the feathers are already separate pieces. Children can decorate or write on them individually, then bring all of their answers together when the turkey is assembled.
If you are making several turkeys, each one can have its own collection of messages.

More Ways to Personalize Your Turkey
Once the basic shape is finished, there are several easy ways to change its appearance.
Try different feather colors
Use autumn shades such as orange, yellow, red, and brown, or create a brighter tail with contrasting colors.
Change the textures
Instead of ordinary paper, experiment with lightweight textured paper or other thin craft materials that can still be cut and glued easily.
Give each turkey a personality
Slightly change the eye placement, feather arrangement, or facial details. Small differences can make a group of paper turkeys feel much more lively.
A Simple Way to Make the Craft Easier for Younger Children
If children are still developing their cutting skills, prepare the small pieces ahead of time.
You can cut the body, eyes, beak, snood, feathers, and feet first, then let the child concentrate on the more creative part: choosing colors, arranging the feathers, and putting the turkey together.
Older children can take on more of the process by measuring the shapes with a ruler and drawing their own cutting lines.
This way, the same craft can be adjusted to suit the child without changing the basic design.

Note: If you face any hurdles in creating this project, then you can watch the tutorial here.
Let It Dry Before Displaying
Once every piece is in place, leave the turkey flat until the glue has dried.
This is especially important around the feather fan because the overlapping pieces can shift if the turkey is moved too soon.
After it has dried, gently check the edges. If a small corner has lifted, add a tiny amount of glue underneath and press it down again.
Save this pin for future!


[…] become a little more playful when everyone can make and wear something of their own. This paper turkey headband combines a simple yellow band with a cheerful turkey face and a colorful feather […]