
A traditional Halloween mask is a perfect project to embrace the spooky season! It’s a fun and creative way to make your costume stand out. Whether you’re aiming for scary, quirky, or classic designs, this mask can be worn for trick-or-treating, parties, or simply as festive decor.

Simple Traditional Halloween Mask
To create this mask, you start with a simple base like a craft-store face mask. Materials like tin foil and masking tape help shape the features, and papier-mâché clay adds detail and sturdiness. You don’t need fancy tools—just basic household items like tape, foil, and water can work wonders!
Credit Mythical Makers Workshop
Once the clay hardens, it’s time to bring it to life with paint. Start with neutral tones and layer shadows for an antique, weathered look. Add straps using cord or ribbon, so it fits comfortably. This makes the mask durable yet lightweight for wearing all night.
This project can double as an art piece or even a keepsake to reuse every year. You’ll love how simple materials come together to create something unique. Get creative with shapes, colors, and themes to make a one-of-a-kind Halloween masterpiece that everyone will admire.
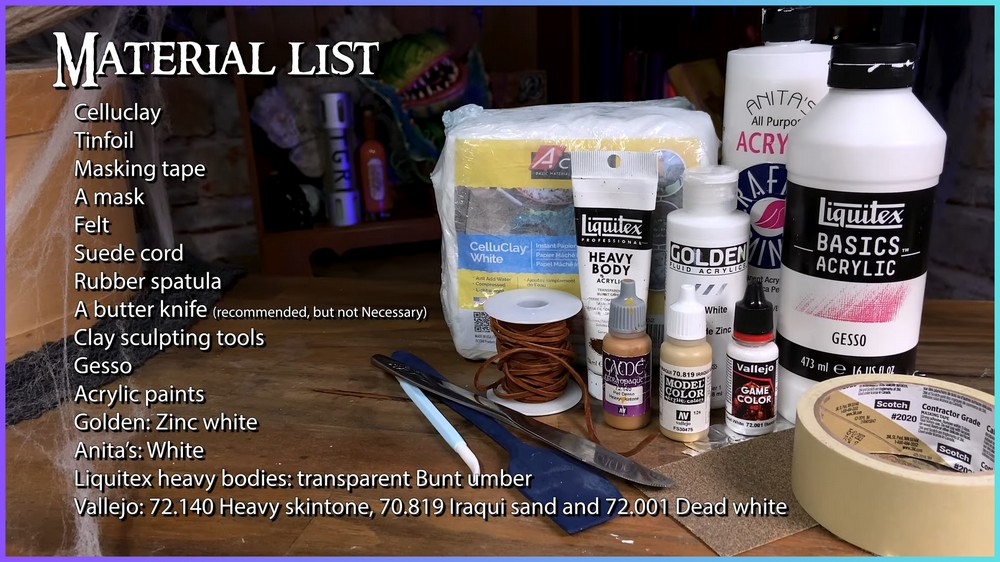
Required Materials
- Base Mask: A full-face plastic craft mask (commonly available at craft or dollar stores).
- Structural Support: Tin foil or crumpled newspaper (used to bulk up the mask’s structure).
- Masking Tape: Tape for securing added features, smoothing sharp edges, and shaping.
- Celluclay Instant Papier-Mâché: A pre-mixed, easy-to-use papier-mâché material for sculpting.
- Water: To mix with Celluclay and get the proper sculpting consistency.
- Saran Wrap: Used as a barrier layer to prevent clay from sticking to the mask while sculpting.
- Tools for Shaping: A silicone spatula, butter knife, and your hands for molding intricate details.
- Sandpaper: 80-grit sandpaper to smooth down rough or uneven surfaces.
- Gesso: Primer used to prepare the mask’s surface for painting.
- Paints: Assorted acrylic paints for weathering and customizing the mask. Recommended colors include off-white, tan, burnt orange, and darker shades for texture.
- Paintbrushes: Various brushes for base coating, dry brushing, detailing, and weathering.
- Mask Straps: Suede cord or similar material to create straps that secure the mask.
- Drill: To create durable holes for securing the straps (optional if hand-punching is not feasible).
Important Notes
- The creator emphasized respecting the cultural roots of Halloween by reflecting traditional aesthetics inspired by the ancient Celtic Pagan festival of Samhain.
- Celluclay was selected due to its traditional papier-mâché look and easier application process.
- Saran Wrap is a simple yet effective trick to ensure papier-mâché doesn’t permanently adhere to the base mask during the initial sculpting process.
Detailed Instructions
Base Mask Preparation:
Start with a simple plastic full-face mask sourced from a craft store. Customize the structural details by using tin foil or crumpled newspaper to reshape or enhance features such as the brow, cheekbones, nose, or chin.
If desired, you can also add elements like horns or other decorative features to bring your vision to life. Once the structural adjustments are complete, wrap the additions with masking tape to secure them firmly in place and to smooth out any sharp edges. Be thorough with the taping to ensure the structure remains stable and durable throughout the rest of the process.

Mixing & Preparing Celluclay:
Scoop the desired amount of Celluclay into a bowl and gradually add water to the mixture, mixing it thoroughly with your hands or a silicone spatula. The consistency should be thick and moldable, similar to clay—not too runny or crumbly.
If the mixture feels too sticky, add more dry Celluclay, or if it’s too dry, gradually incorporate more water until the desired pliability is achieved. Any leftover Celluclay can be stored in an airtight container and kept in the refrigerator for future use.

Applying the Celluclay:
Before applying the Celluclay, wrap the base mask, including any tin foil or newspaper additions, in Saran Wrap to create a non-stick surface, making it easier to remove the papier-mâché layer later. Begin layering the Celluclay onto the mask, working in small sections while pressing and smoothing the clay as you go.

Use your hands to cover broad areas and tools like a silicone spatula or butter knife to carve details such as wrinkles, textures, or sharp edges. For finer sculptural elements, such as raised cheekbones or intricate designs, keep the surface wet by dipping your fingers in water. This helps prevent the clay from tearing or drying out during the shaping process.
Drying & Smoothing the Mask:
Once the sculpting is complete, allow the mask to air dry completely, which typically takes around 16-24 hours depending on the thickness of the clay. Once dry, use 80-grit sandpaper to smooth out any sharp edges, rough patches, or uneven areas. While sanding, be careful not to remove important textures or sculpted details, ensuring that the overall design remains intact and refined.

Priming the Surface:
To prepare the dried and sanded mask for painting, apply two coats of gesso to serve as a primer. Gesso not only seals the mask but also creates a neutral, slightly textured surface ideal for painting. Be sure to allow each coat to dry completely before moving on to the next stage.
Note: If you face any hurdles in creating this project, then you can watch the tutorial here.
Painting and Weathering:
Begin by applying an off-white or light tan base coat to mimic the appearance of natural materials such as bone, wood, or aged papier-mâché. Add dimension and depth by layering additional shades like tan, beige, or burnt orange, using dry-brushing techniques to subtly blend the colors and create a weathered effect.
For an antique or spooky aesthetic, apply darker tones, such as brown or black, in recessed areas to simulate shadows and make the features stand out. Highlight raised areas with lighter colors to enhance contrast and give the mask a realistic, three-dimensional appearance, blending thoroughly with soft brushes to ensure a cohesive and polished look.

Adding Straps:
To make the mask wearable, attach straps using suede cord. Drill two holes on each side of the mask, approximately above where the ears would sit. If the mask has heavy features, such as horns, drill two additional holes at the top to create a loop for balancing the weight. Thread the suede cord through the holes and tie secure knots, ensuring the straps are both comfortable and adjustable for the wearer.
Final Details:
Review the mask for any final adjustments or touch-ups, adding additional weathering or highlights as needed to refine its appearance. Take a step back to evaluate the mask from all angles, ensuring that the coloring and design are consistent and well-balanced. Once everything is complete, set the mask aside and allow it to dry thoroughly overnight before wearing or displaying it.

