Get ready to dive into a delightfully simple and rewarding craft that transforms an everyday material into something extraordinary! These DIY Velvet Ribbon Strawberries combine creativity, elegance, and fun into one easy project, perfect for crafters of all skill levels. Whether you’re a beginner or an experienced DIY enthusiast, you’ll appreciate how quickly these adorable berries come together in just 15 minutes. Plus, their charming handmade feel will leave you inspired to make even more.

Velvet Ribbon Strawberries
This project is all about creating luscious, lifelike strawberries with a soft velvet texture using minimal materials like ribbon, decorative leaves, and beads. What makes these strawberries truly special is their realistic yet whimsical look, making them perfect for home décor, gift toppers, or even as party favors. Their versatility doesn’t stop there—they can also be used to decorate wreaths, garlands, or display bowls for a pop of handmade charm. With endless possibilities, these lovely creations are a heartfelt addition to any project or gift that needs a unique touch.
Features & Benefits:
- Skill Level: Beginner-friendly, suitable for all experience levels.
- Time Commitment: Make a single strawberry in just 15 minutes!
- Versatility: Use these berries for décor, party crafts, or thoughtful gifts.
- Gifting Ideas: Perfect for personalized presents, ornaments, or embellishments for wrapping gifts.

Credit MiLena
How To Make Velvet Ribbon Strawberries
Materials Needed:
- Dark red velvet ribbon (5 cm wide, cut into 10 cm pieces per strawberry)
- Decorative ribbon leaves (any leafy decorative ribbon for the top of the strawberry)
- Cord (for finishing and hanging the berry)
- Filler material:
- Cotton wool or synthetic filler (e.g., polyester fiberfill)
- Decorative extras (optional):
- Beads or bead caps
- Yellow fabric contour paint (or universal fabric contour paint)
- Tools:
- Needle
- Thread
- Scissors
- Lighter
- Glue (hot glue or fabric glue)
Instructions:
1. Cut the Velvet Ribbon
- Measure and cut a 10 cm piece of the dark red velvet ribbon.
- Ensure the edges are smooth as this will form the base of your strawberry.
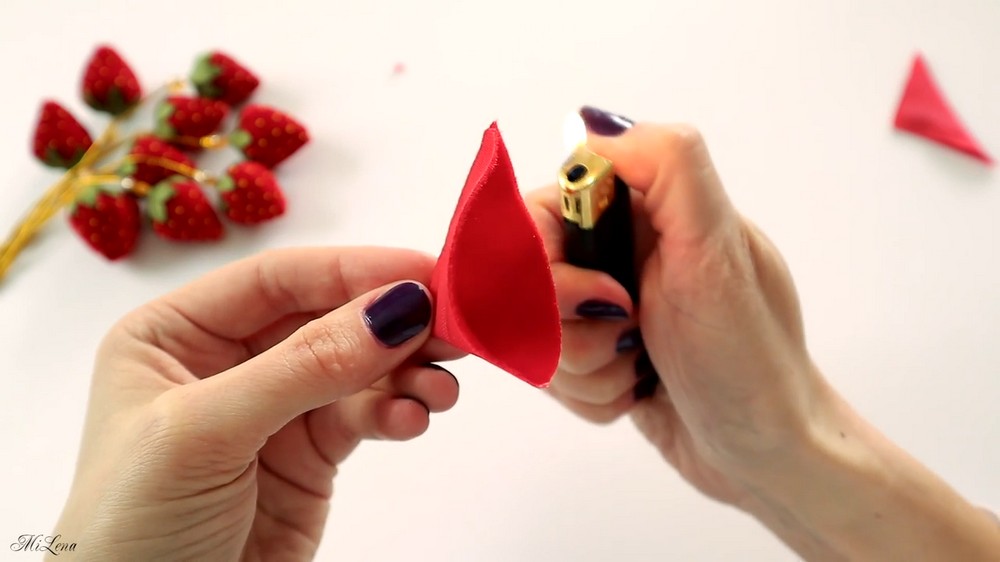
2. Fold and Shape the Ribbon
- Fold the ribbon face inward so that the outer surface of the ribbon faces inside.
- Use scissors to round off one edge of the ribbon slightly (this rounded edge will form the bottom of your strawberry).
3. Secure the Rounded Edge
- Stitch the rounded edge together to close it, or use hot glue to hold the shape in place.
- Trim any excess fabric if necessary.
- Use a lighter to carefully seal the edges (this prevents fraying).
4. Turn the Ribbon Pocket
- Turn the sewn or glued pocket inside out so that the velvet side is now on the outside. This forms the body of the strawberry.
5. Fill the Strawberry
- Use cotton wool or a synthetic filler to tightly stuff the pocket. Adjust the amount of filler depending on how plump you want the strawberry to look.

6. Secure the Top
- Gather the open edge of the filled pocket with a needle and thread. Sew a running stitch around the edge, pull it tight to close the top, and secure it with a knot.
- This creates the strawberry’s characteristic shape.
7. Attach the Cord
- Stitch or glue a cord to the top of the strawberry for hanging or as a finishing detail. Use a needle to arrange the folds for a neater look if necessary.
8. Add the Leaves
- Take your decorative ribbon with leaves and attach it to the top of the strawberry using glue. Adjust the leaves so that they fan out naturally.

9. Optional Decoration
- Beads or bead caps: To add extra flair, attach beads or small caps to the top of the strawberry for decoration.
- Yellow fabric contour: Use yellow fabric paint to make small dots on the surface of the strawberry to simulate seeds. Be creative with the placement of each “seed.”
10. Let It Dry
- If you used fabric contour paint, hang the strawberries by the cords to allow them to dry fully.
11. Finished Product
- Your velvet ribbon strawberries are ready! Use them for decoration in your craft projects, as ornaments, or as fun embellishments.
