Making heart-shaped earrings is a fun, creative craft that allows you to design beautiful accessories with ease. Whether you’re crafting for yourself, as a gift, or to complement your outfits, this project turns simple materials into sparkling, romantic pieces you’ll love to show off. Perfect for beginners and those with busy schedules, it’s an engaging way to add a personal touch to your jewelry collection.
This project focuses on creating charming heart earrings that are lightweight, stylish, and one-of-a-kind. Using simple crafting techniques and materials like resin, clay, or beads, you can customize these earrings with colors, patterns, and textures to match any style. The finished earrings are versatile enough to wear for casual outings, formal events, or even as thoughtful handmade gifts for loved ones.
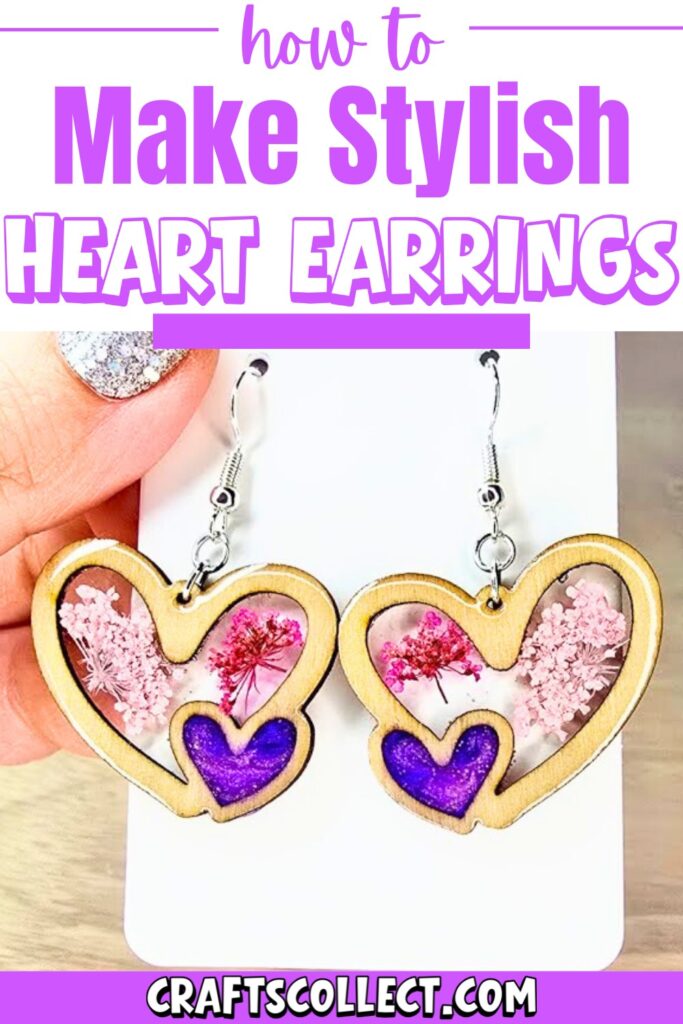
Credit SophiaTheHobbitCrafter
Features & Benefits:
- Skill Level: Perfect for beginners—no advanced skills required.
- Time Commitment: Easy to make and quick to complete.
- Versatility: Great as everyday accessories or gifts.
Required Materials
- Heart-shaped wooden bezels (these form the base of the earrings).
- Resin tape (to hold everything in place and prevent resin leaks).
- Clear UV resin (for creating the main structure inside the wooden bezels).
- UV light (for curing the resin).
- Pink and purple resin colors (to decorate the hearts further).
- Pressed flowers (for adding a floral decorative touch).
- Heat gun (to pop any bubbles in the resin).
- Mica powder (optional, for added shimmer).
- Earring hardware (silver or gold, depending on your style preference).
- Wooden blocks (to securely hold pieces during crafting).

Important Notes
- Ensure the heart wooden bezels are sanded down to remove any burn marks before starting.
- Use resin tape to avoid leaks—push down the bezels securely to create a proper seal.
- Be careful with air bubbles during resin work; a heat gun can help.
- Curing with UV light is done layer by layer for the best results.
- When using pressed flowers, arrange them carefully, and don’t hesitate to trim oversized ones to fit.
- Always ensure even resin coverage, including edges and backs.
- Gold hardware works well with purple and pink tones, but silver is a great alternative depending on your preferences.
Detailed Step-by-Step Instructions
- Prepare the Bezels
- Sand the heart-shaped wooden bezels to remove any burn marks or imperfections.
- Secure them to a base with resin tape, ensuring there are no leaks.
- Add the First Resin Layer
- Pour clear UV resin carefully into the wooden bezels.
- Use a small tool to guide resin along the edges and fill out the heart evenly.
- Use a heat gun to eliminate any air bubbles.
- Cure the resin under a UV light.

- Add Colored Resin
- Mix pink and purple resin colors to your liking. Adjust the blend for more purple or pink as desired.
- Pour the colored resin into the bezel on top of the clear layer.
- Mix lightly for a marbled effect, then cure with UV light.
- Add Pressed Flowers
- Arrange pressed flowers inside the resin layer. Trim flowers if they are too large.
- Cure with UV light to secure the flowers.

- Add a Topcoat of Resin
- Pour a top layer of clear resin to seal the flowers.
- Spread the resin evenly across the surface, ensuring all edges are covered.
- Use a heat gun to eliminate bubbles.
- Cure with UV light.
- Finish the Back
- After removing the tape, check the back of the bezel. If there is residue or an uneven surface, sand or clean it as needed.
- Apply a thin layer of UV resin to the back for a polished, matching look. Cure with UV light.

- Attach the Hardware
- Attach either silver or gold earring hardware to the bezels.
- Ensure the hardware is securely fastened and matches the overall design.

- Final Touches
- Inspect the earrings for any imperfections. Use tools to clean up residue or uneven areas.
- Pair the earrings with a stylish display card, if desired.
